Peanut Chicken with Red Peppers & Rice!

This is one of my fave simple recipes to make. So easy and it’s delicious.

Ingredients (I recommend using organic when possible):

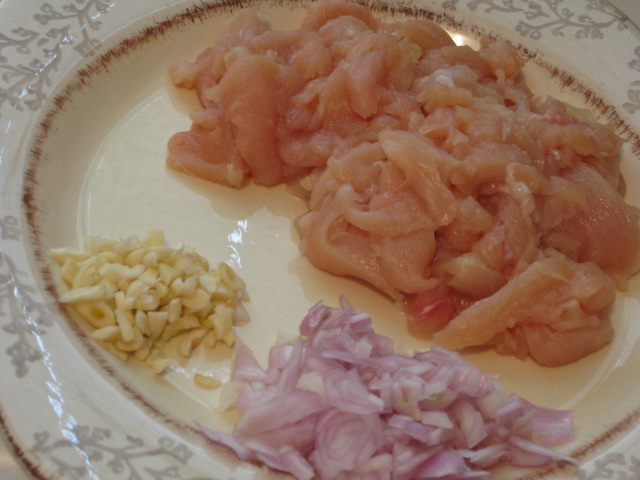
2 med organic chicken breasts (sliced in small pieces/or cubed)

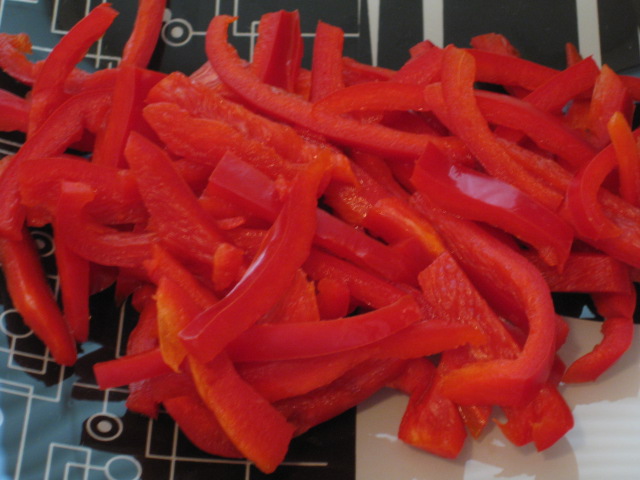
1 large Julienne cut organic red pepper

2 finely chopped shallots

3 or 4 cloves garlic (diced)

Dash of salt, pepper, Mrs Dash salt-free Original Seasoning

Peanut Sauce:

4 TBs soy sauce (you can use light if you prefer)

1 TB white vinegar

1 TB corn starch

1 Tsp brown sugar

1 TB creamy peanut butter

Mix the sauce ingredients together well before adding

Image

Image

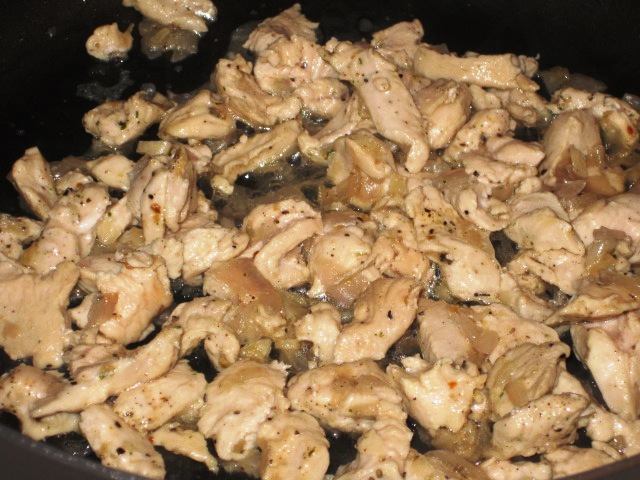
In a large, deep skillet, put 2 TBs cooking oil. Add in shallots and garlic on medium heat until caramelized. Add in the chicken breast pieces. Sprinkle some salt, pepper, and some Mrs.Dash seasoning. Don’t add a lot of salt because the soy sauce/peanut sauce will have enough.  Allow to cook on medium heat, stirring occasionally.  Cover the skillet and lower heat.  Image

Image

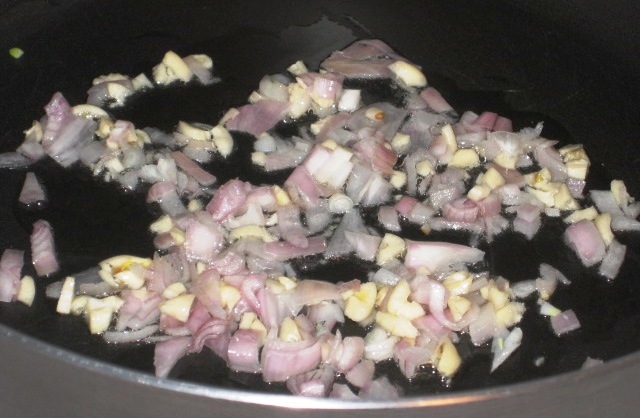
Once the chicken is cooked, add in the bell peppers. Cover skillet again and allow peppers to cook. Stir occasionally. Simmer for about 10 minutes.Image

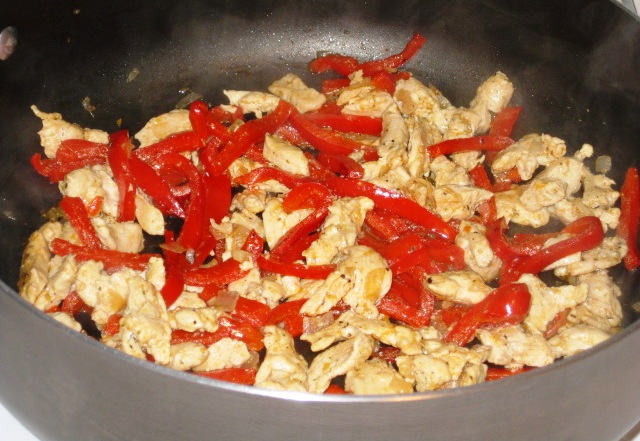
Add in the soy sauce/peanut sauce to chicken and peppers. The sauce will thicken quickly. Keep adding water until you find the consistency you want. I used about 1/2 cup of water. Bring to a boil and remove from heat.Image

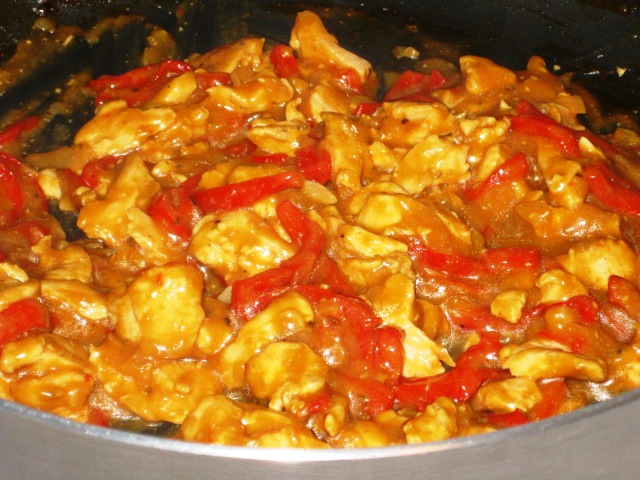
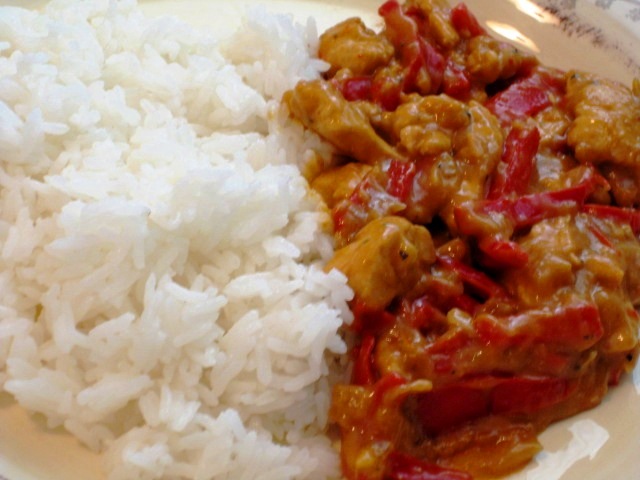
Now, doesn’t that look yummers? The wonderful peanuty flavor and sweet red peppers is divine. You can eat this dish plain or with rice.  I chose to eat it with rice. I’m Filipino, come on,now. You gotta have the rice!  🙂 Image

Is funnel cake an Earth Day food?

Yes, I’m kinda bummed I didn’t get to go outside and play on Earth Day. Don’t you hate when work gets in the way of your life? Haha. Just kidding, work. 🙂  Anyhoot,  I did miss a few festivals. What I love about them are the usual things, you know…the funnel cakes, kettle corn, hot dogs, and looking at all the different doohickeys the different vendors have crafted.

Today in particular I was craving some funnel cake. I’ve never made them before, however, I opted to use Paula Deen’s funnel cake recipe online. I used half of the recipe and it made plenty of batter.

Tadah! Okay, so they are REALLY golden brown and look more like crab cakes than funnel cakes, pay no attention to that.  But, man! They are just as delicious! I used fresh, ripe strawberries and whipped cream. Sometimes I actually like to drizzle a little bit of maple syrup but this batch didn’t require any. It was so good. So, in a sense, I get to enjoy a little bit of outdoors, indoors.  🙂 Yay for me.

Image

It’s a sad world outside. I want to stay inside and make comfort food.

It’s been days since my last blog. Anyone who’s been watching the news can relate to the fact that it can be easy to lose your faith in humanity entirely. But then, why let those people win? Right? No, thanks. Some days you just don’t want to get out of bed or leave the house.  Am I right?

So, this morning, I felt like combining something yummy for breakfast that’s both warm and chocolatey — champurrado! Or in Tagalog, “champorado”.

Start with a cup of sweet rice. Rinse thoroughly. Place in pot and bring to boil with 6 cups of water. Once boiling, reduce heat to simmer, stirring occasionally to avoid clumps and burning. Once rice is cooked, pour out most of the water but leave just enough so it’s not dry.  At low heat, stir in 2 tablespoons unsweetened cocoa.  Stir until cocoa is well mixed. Remove pot from heat.  Serve warm and enjoy by adding sweetened condensed milk or whatever you prefer to sweeten with (fruit, nuts, honey,etc).

Image

You can also top with a little bit of whipped cream and sprinkle with some more cocoa, like so.  Enjoy!

Image

Icy & Slushy drinks with the ice cream maker!

It’s heating up out here! A few of you know how much I enjoy those icy, slushy drinks when it’s hot out. The other night I was sitting here craving some while watching “The Walking Dead” and thought, “Hey…I wonder if the ice cream maker would freeze drinks enough to make the slush?”. So, began my experiment.  Guess what? It does! How exciting!

Home-made icy,slushy drinks made at home is possible! I’m happy. How?  Just pour as much as you want into the home-made ice cream maker.  I have the basic Cuisinart model. Turn it on. Let it spin around and pour your juice/mixture. Let it run until you see it becoming icy to the consistency you want.  Once you have that,  turn off the machine and enjoy your slushy drink.

Image

Sweet Rice & Coconut with Caramel Sauce for Easter? Sure!

Easter is usually a time to cook up traditional dishes and desserts. I kept seeing recipes to alter and tweak Peeps which I really don’t like so I opted to enhance a traditional Filipino dish — bibingka malagkit (sweet rice with coconut milk and caramelized coconut).

You take 1 cup of sweet rice.  Put rice into a deep pot, rinse thoroughly and soak in warm water for about 15 minutes. This is the process I follow for my rice pudding recipe as well.  Pour out the water. Add in 1 can of sweet coconut milk and equivalent amount of water. Allow to boil and reduce heat. Stir occasionally so it doesn’t burn on the bottom. Once rice is cooked,  remove from heat.

Preheat oven to 150 degrees.  Take out a 9×9 or 9×13 greased pan. Pour sweet rice into the pan and spread over evenly.  In a bowl, mix together 1/2 can of Nestle’s Dulce de Leche condensed milk with 1 tablespoon of milk. Mix together so it’s easy to pour.  Pour over top of sweet rice. Bake for 45 mins.  Do not allow top to burn.  Remove from oven and allow to cool.

Once cool, serve and enjoy! I actually put the rice in the fridge and used a large biscuit cutter to make them round. I just thought they were prettier served this way.

Image

Don’t these look yummers?  I opted to top them off with toasted grated coconut for a more authentic Filipino flavor.  We do love our tropical fruits.   I have to tell you, the incredible flavors of coconut and caramel are undeniably delicious.  Enjoy! Image

What to do with leftover fundraising chocolates & cheesecake? No problem.

You know, I hear a lot of friends say they’re really not into baking because it’s so much work. There’s an actual “science” to it and they have never been any good at it. I get it. But baking isn’t always about reinventing the wheel. I felt the same way when I started. I thought everything that could possibly be done already has been and I would get discouraged.

I guess I can compare it to music. Sure, every note has already been played before but it’s in the arrangement of notes that make a song unique. That’s how I see baking.  It doesn’t have to be difficult. It just has to be creative and fun and you have to invent a way to make it your own.

Take this recipe for example.  My niece was selling fundraising chocolates and of course, being family, I had to buy a good load of them! This sounds familiar, right? Well, I was looking around to find something to bake and noticed I still had some baked goods left over.    (You see what I’m getting at?). Tadah! Cheesecake, crushed pistachios, fundraising chocolates, graham crackers…hmmm..I’ve got it! How about “Chocolate Covered Cheesecake Balls topped with Pistachios”?

So, there you go. A new recipe is born and I didn’t even have to pop anything in the oven. It’s that simple, really.   Try it out! Let me know how you like it.

Start with allowing your leftover cheesecake to set at room temperature. Once that’s done, take a cup of graham cracker crust and place them in a bowl or wide plate. Take a spoonful of cheesecake and drop them into the plate. Roll it around and get enough crust on them to make into even-sized balls.ImageOnce you’re done transfer the balls onto another plate lined with parchment paper and put in freezer until it sets.  While the balls are setting,  take your fundraising chocolate (mine were a variety of bars — almond, wafer krisp, caramel) and break into small pieces. Please in microwaveable bowl. Put in microwave for 2 minutes on 50% power.  Check and stir to make sure the consistency is melted enough to drizzle/coat. Take the cheesecake balls out of the freezer and immediately top the balls with melted chocolate.ImageOnce you coat the ball with chocolate, top with crushed pistachios right away before the chocolate sets and hardens.  Continue this process until all the balls are done.  I decided to use small baking cups to put each ball in so they look like truffles.  Aren’t they pretty?  Place the balls back in fridge and serve when ready.ImageNow, don’t they look yummers?  I used almond bars with this recipe but, of course, you can get as creative as you want with this depending on what chocolates you have around. Experimentation is the fun part.  I always say that baking courage begins with making a mess.  If you don’t get chocolate on you then you’re not doing it right.  Haha.

Ever experiment with Biscoff Spread? Here’s a new recipe!

Wow, what a week! While some people are out celebrating, I’m baking something to take to the dentist’s office for an early appointment tomorrow. Those crazy folks eat more sweets than most people. Who knew? “Mel, look here. Nobody realizes how much of a sweet tooth we all have! If you’re ever in need of getting rid of any leftover baked goods, you know where to bring them. lol”. Exact words, my friends. I won’t name names but when they opened their cabinets I swear I thought a candy bar would jump up at me!

So, back to my recipe. I wanted to try out a new one tonight. Completely experimental. I’m calling this one my “Cinnamon Biscoff Cream Cheese Vanilla Cake”.

It’s basic vanilla cake ingredients, Biscoff spread, added some cinnamon, whipped up cream cheese and put them all together and baked in a 9×9 pan for about an hour & half at 350 degrees.  Layer them like so:  vanilla cake, then cream cheese mix, and top with Biscoff spread and cinnamon.

Image

After an hour & half of baking, I let the cake cool a bit but kept it warm enough. Once cooled, you can cut them up into squares or serve a la mode while warm like I’m having.

Image

It turned out to be a very sweet experiment.  It is sooo good a la mode! The cake tastes similar to a coffee crunch cake and I love that every side of the cake is crunchy and toasted perfectly.  I sure hope the dentist office likes it.biscoff cake final packaged up